Wow!!! That sure was an unintentional blogging break! After not blogging for several days I started to feel over-whelmed with the idea of posting again. I had so much to say! I decided to ease back in slowly, so here I am.
We had a super Christmas, and believe me, I must have been a VERY good girl this year because Santa was VERY good to me!!
I finally got the camera I've been drooling over for over a year now. The Canon Digital Rebel XT. It scares me.
Santa also brought me a chocolate melting pot.
We are going to a pot-luck dinner tonight, so I made some chocolate-covered pretzels to take (among other things). They aren't pretty, but they ARE yummy. I know. I've already had about 6.
Happy New Year's everyone!!! I will not disappear that long again. It actually feels great to be back.
Monday, December 31, 2007
Thursday, December 20, 2007
Lazy Gift Bags
Whew!!! What a week it's been. I'm completely "burned-out" and I can't wait for the Christmas Break!!!
I've yet to put the finishing touches on my Christmas shopping. I don't have much left to do, but still, I HAVE to get out there and get it done! I'm just not feeling the motivation to go and face the crowds.
I realized yesterday that I had to deliver my "school gifts" today. I haven't even bought gift bags yet, so I whipped out my glue, buttons and rick rack and made these.
Ok, now I can see that I need to trim the rick rack on one of the bags. Good thing I haven't delivered them yet.
I think I'm going to sit down and seriously make a list of all the things I have to do in the next few days. Maybe then I'll feel better.
Friday, December 14, 2007
Merry Christmas to me!
I found a gift certficate for Chapters that I had totally forgot about. How did that happen???
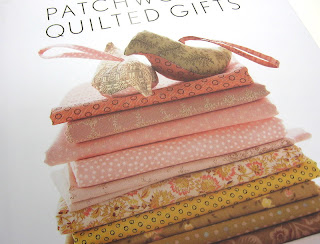
Anyways, I finally bought myself a copy of Last Minute Patchwork Quilted Gifts.
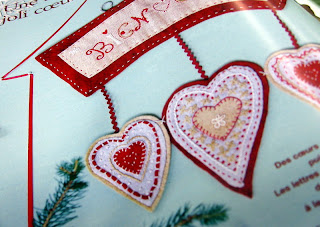
I had a couple of dollars left after I bought the book so I grabbed a magazine that I had not heard of before, Crafts Beautiful.
Wow! I love this magazine, it certainly lives up to it's name!
I LOVE this Christmas ornament:
And this card:
We are expecting a major winter storm this weekend including up to a foot of snow! This is very inconvenient timing for me as this was the weekend I had hoped to get the bulk of my Christmas shopping done. I have to say though, a weekend spent in front of a roaring fire drinking hot chocolate is not exactly making me sad.
Thursday, December 13, 2007
More Christmas Craftiness!
Inspired by these cute little trees I made my own for the library.
These were my second and third attempts. Trust me, attempt number one was not a pretty sight. I think they look sweet using the old spools of thread as bases.
And then last night I got it into my head that I needed to knit a mini sweater ornament. I used this pattern.
My first attempt was a disaster. Why can't I ever ever ever ever get anything right the first time??? he he he I blame the fact that I didn't exactly READ the pattern, I assumed what it was going to say and off I went.
I quickly cast-on sweater number two. It took me much longer to knit because I was actually READING the pattern very carefully as I went along. The snowflake on the front is from my scrapbooking stash (yes, I have one of those too!) and the drapery hook was part of an AMAZING package sent to me from Felicia. (Thanks AGAIN Felicia!!!)
Just to prove that sweater 1 & 2 are not the same:
And as if I don't have anything else to do (ya right!). I cast-on a mini hat ornament this morning to match the sweater. I'm crazy.
Tuesday, December 11, 2007
Workplace Crafting
Yesterday I had it in my head that I was going to do some Christmas deocorating at work. In the morning I made the paper chain garland to decorate the circulation desk.
In the afternoon, I managed to bully two teenage boys into helping make a paper version of these adorable trees. When they asked how many I wanted and I said "a forest" they both rolled their eyes. I laughed. By the end of our tree-making session, they wanted to make more. They carefully arranged the trees in clumps on the desk for me and even taped them down so that nobody would steal them. It was amazing.
Sunday, December 09, 2007
A Scrappy Garland
I went into my craft room early on Sunday morning with the plan to do a little bit of organizing. I came across a stack of Christmas fabric that I bought and haven't yet used. I drew up a pattern for a Christmas stocking, but my heart wasn't really in it.
I was trying to decide if I really wanted to make Christmas stockings and I dragged out some red rick rack. A light bulb went off. A scrappy garland! Yes!
I threw out the pattern for the stocking and after a couple of hours of tying strips of fabric to the rick rack, here's my new scrappy garland.
Our living room is way too dark for a photo of the garland in action, but trust me, it's cute.
It even matches my little Christmas trees.
Friday, December 07, 2007
Another button bracelet
I'm all about using my button collection lately. Inspired by this awesome bracelet by Regina of Creative Kismet I made this...
The bracelet is laying on top of my new taupe-coloured hoodie cardigan. I can't wait to wear them together. Maybe today!
I have to say not much crafting has been going on around here. Today is day 4 of a super-duper migraine. I've been working through it, but basically coming home and sleeping away the evenings. I hope this is the end of it!
Have a great weekend!
Wednesday, December 05, 2007
Easy Peasy Gift Tags
I bought two rolls of wrapping paper on the weekend and I wanted to make tags to match. All I did was snip a strip off each roll, cut it into tag-sized pieces, tacked it onto the tag with a bit of double-sided tape and stitched the paper to the tag. Easy peasy.
In some cases I sewed around the perimeter of the paper, in others I zig-zagged over it. I know it's nothing fancy, but at least now I have gift tags to match the paper (I love that!).
Yesterday my bath bomb making supplies arrived. If my head is better, I might make another batch (or two, or three) tonight after work.
Monday, December 03, 2007
My little forest
As soon as I saw this tutorial I KNEW I had to make my own.
Due to technical difficulties, (the interfacing I used was too light), I had to improvise a little bit. Instead of sewing the zig zag seam along the bottom edges of the cones, I sewed a band of rick rack on. Instead of stitching the cones closed, I cheated in a big way and used fabric glue.
Mid-way through the first tree I was going to give up because they weren't turning out the way they looked in the tutorial, but I fought that urge and kept going. I'm glad I did.
They look less wonky in real life than they do in the photo (thank goodness!).
This was a great little project for a snowy winter day.
Sunday, December 02, 2007
Our First Snowfall
Well, let me tell you, the world looks a whole lot different this morning than it did yesterday.
That is the view early this morning from our back porch. Yes, that's my new car all covered in snow!
Thank goodness for snow blowers is all I can say! My job was to clean off the cars and shovel the front and back porch. I've been done for about 20 minutes. Joe is still outside blowing not only our snow, but most of our neighbour's walkways as well.
I had fun with the dogs while I was shoveling the back porch.
Apparently it's fun to have shovels of snow thrown at you and to jump high in the air and try to eat it (if you're a dog).
The black dog is Dolby, he's a Whippet/Rottweiler mix, dumb as a stump. Chinook is the Shepherd mix. She has failing hips although you'd never know it from her antics this morning.
I think it's time for a hot bath (with a bath bomb, of course) and then it's time for a little sewing and maybe even a nap!
Oh, the freezing rain is expected to start anytime now. That will be fun.
Friday, November 30, 2007
Bath Bombs
I've wanted to make bath bombs for a while now. After reading as much as I could and making notes about them, I set out after school on Wednesday to gather the necessary supplies, baking soda (easy), cornstarch (easy), oil (I already had), colouring (easy), essential oil for scent (easy), citric acid (NOT so easy!).
I went to the health food store first and bought an itsy bitsy jar for around $7.00. That was enough to make one recipe. Then I went to the Bulk Barn and bought the same size (itsy bitsy) jar for $4.50.
As I was driving home I was completely discouraged bacause I realized this was not going to be the cheap and fun project I was hoping for. I really wanted to find an affordable little gift to give to people that I wouldn't normally buy gifts for.
I came home and made a batch. Everywhere I read stressed NOT to add too much water so I was very very skimpy when adding it. My first few attempts to mold the bombs failed because there just wasn't enough liquid in the mix. Once I got the mix "right", things seemed to me moving along quite well.
It became apparent as they were drying that cracks were forming. I went back to the Internet and realized it was because I didn't pack the molds tight enough. Lesson learned.
The batch I made yielded three bombs and a mini-bomb. I used the mini bomb yesterday morning and Joe used one last night. We both loved them!
I didn't really follow one particular recipe, I took bits and pieces from many different ones. If you "Google" "bath bomb tutorial" you will get a million hits. Most recipes are the same, you just need to decide which one you're going to follow.
On a positive note, I found a place online that sells 2 KILOGRAMS of citric acid for $11.00. I've ordered some, along with some different fragrances to make more bombs for gifts.
Tuesday, November 27, 2007
Great mail and buttons
I received the lastest issue of Marie Claire Idees last week and I can NOT stop looking throught it.
I completely adore these stockings:
And these ornaments:
And I want the mittens this snowman is wearing!
I've decided that I absolutely HAVE TO come up with ways to use my embarassingly HUGE button collection. Last night I spent quite a while surfing the Internet for ideas. I made my first button bracelet using this great tutorial by Creative Kismet.
Her tutorial is GREAT with extremely clear instructions. Trust her though when she says to apply glue to the tips of the embroidery floss, I didn't, and it probably took me twice as long to make the bracelet.
I just might take this bracelet apart and make it again. I'm not happy with a couple of the button placements, but I will certainly be making more of these.
Sunday, November 25, 2007
I feel like a thief!
On Saturday, Joe and I met a bunch of friends for breakfast and then we carried on to go and find a couple of geocaches and did a little Christmas shopping.
One of the caches took us to a church cemetary. Lucky for me, there was a Christmas bazaar at the church, so while Joe hunted for the cache, I went to the bazaar.
I just about fainted on the spot when I saw these hand-knit wool socks!
Yes, those price tags say $5.00!!
I knit my own socks and I know exactly how much time goes into knitting a pair. Not to mention the cost of sock yarn!!! I bought the only two pairs that were left, and believe me, if there had been any more I would have scooped them up too.
My feet are so happy!
Saturday, November 24, 2007
I truly hate surprises
Yesterday afternoon I got a very cryptic e-mail from Joe saying you've got plans today from 6:00 on. Of course I replied asking him "what" and of course I couldn't get an answer out of him.
He came home with an envelope which I knew had tickets to SOMETHING in it. I had it in my hand and asked him if I could open it. When I flipped it over, it was SEALED with the words "do NOT open" written on it. Figures.
So, I had a bit of time on my hands and I wanted to make a new purse anyways, so I made this to go with this.
It's completely inspired by a bag I saw SOMEWHERE. I'm not sure if it was on Flickr or Etsy or on another blog. If I find the link to it in my travels, I'll be sure to link back to it.
Anyways, back to my story...
I grabbed the envelope and stuck it in my new purse. We were on a bit of a time schedule and had to stop for Wendy's on our way to wherever it was we were going. Joe told me I could open the envelope after we eat. After quickly scarfing my spicey chicken sandwich I asked if I could open the envelope. "Yes". Finally!! So...I rip into it and there's a folded piece of paper which reads.."I told you not to open it". GRRR!!!!!
After much whining and telling him that "this isn't funny anymore" we got back in the car.
I was driving and he navigated to what appeared to be an old school in a residential area. I was getting less and less happy. The sign out front said "Niagara Performing Arts Centre" (I think). Still no clue.
I parked (not so well) and he FINALLY gave me the REAL envelope. He had his camera poised, so I knew this was going to be good. It was. He had managed to get tickets to see Brent Butt from Corner Gas which happens to be my absolute favourite television show EVER!
I was beyond excited. I'm really NOT a fan of stand-up comedy but I was so looking forward to seeing Brent perform. He was the third of three comedians in the line-up and BY FAR the funniest!!! There were some peeing-in-the-pants funny moments (I didn't, of course).
I will say this. When he walked out on stage I was slightly star-struck. It was a little weird seeing him right in front of me (we were 8th row, by the way).
So, this morning we are going to have breakfast with a bunch of friends and I'm sure this story will be told with "his" and "hers" versions. Joe will brag about how funny it was to "trick" me, I'm sure.
Have a super weekend! I hope to get some more sewing time in tomorrow.
Thursday, November 22, 2007
Simplicity 3835....again
I went to Fabricland yesterday to purchase the pattern, Simplicity 3835 for my Mother. It was on sale for $2.49 and I think she needs it. While I was there I fell in love with this brown print fabric. I had no idea what it was but after a quick consultation with the experts who work at the store, they agreed it would be perfect for this pattern.
The fabric is polyester. That scared me very much. I remember polyester as being scratchy and looking like plastic, but this was soft and flowy and I decided (since it was dirt cheap) to give it a go.
It was a little trickier to work with than the cotton was, especially when sewing the casing for the elastic around the neck and the hem. The pattern is very forgiving though thanks to that elastic neckband. My little oopsies are hidden in the gathering of the fabic.
I had purchased those iron-on labels a long time ago to use on my change purses and I really didn't like them much then. I think they are awesome now for clothes. There isn't much of a difference between the front and the back of this top and the label makes it a breeze to put on.
Embarassingly, I already have the fabric for two more of these tops. I think I need to find another pattern that I love and move on.
Tuesday, November 20, 2007
Simplicity 3835
After seeing this pattern on many different blogs, finally Lisa of Polka Dot Creations gave me the push I needed to buy the pattern and give sewing clothes a whirl again.
I just finished hemming it this morning and I'm going to wear it today but I was determined to get a photo of it before I did, thus the crappy picture.
I love it and I've already bought fabric to make two more!
I'm thinking of pairing it up with one of my button pendants.
Ok, now I'm going to be late for work, but at least I have a new sassy top to wear. Have a great day!
Thursday, November 15, 2007
Stitched Christmas Cards Tutorial
Step 1: Gather your supplies
You will need:
Assortment of patterned Christmas-themed scrapbooking paper
8½” X 11” sturdy cardstock
Buttons (or other embellishments)
Photo Squares (or other paper adhesive)
Tacky Glue (to glue on embellishments)
Paper trimmer, not mandatory, but it makes things easier!
Scissors
Sewing machine and thread
Step 2: Cut your cardstock
Cut the cardstock in half so that you have two 5½” X 8½” pieces.
Cut one of those pieces in half, so now you have 1 - 5½” X 8½” piece and 2 - 4¼” X 5½” pieces.
Fold the 5½” X 8½” in half for the actual note card.
Step 3: Cut your patterned paper
Cut your background paper to 4¼” X 5½”.
Cut a triangle out of the other paper and a little square for the tree trunk.
Step 4: Assemble pieces
Using the photo squares, attach the background paper (4¼” X 5½” scrapbooking paper) to the 4¼” X 5½” piece of cardstock. Assemble the tree and attach it to the card front.
These pieces are going to be sewn so at this point, we are simply tacking it down to prepare for the stitching.
Step 5: Stitching the tree
Stitch around the tree, starting and finishing at the top.
Trim the loose threads.
This will be covered by a button.
Step 6: Stitch the perimeter of the card
At this point I stitch around the border of the card.
Step 7: Attach stitched card to note card
Using the photo squares I permanently attach the card front to the note card.
Step 8: Embellish the card
I attach a button to the top of the tree, but you can embellish it at this point any way you like.
And you’re done!
Here are some of the templates I have used but feel free to create your own!
Variations:
Using this technique, you could make cards using any holiday shape, stars, snowmen, gingerbread men, candy canes, etc.
You can use fabric instead of paper by using Heat’N’Bond to attach the fabric to the card front.
You can use rick rack and other trims to embellish the cards.
You could trim the paper (or fabric) with pinking sheers to give the edges a “pinked” look.
You could use rubber stamps to further embellish the card.
NOTE: Make sure you change your sewing machine needle before sewing again on fabric, the needles get very dull when sewing on paper!
Thanks to Karen from Cotton Spice for inviting me to to participate in the Last Minute Gift Countdown!
Cute as a cupcake!
I have no idea (at all) why I had to do this, but I just HAD to knit the cute little cupcake from the book One Skein.
Here's cupcake number one:
And cupcake number two:
They are completely useless, but cute as ever and terribly fun to knit!
(There you go Lera!)
Here's cupcake number one:
And cupcake number two:
They are completely useless, but cute as ever and terribly fun to knit!
(There you go Lera!)
Subscribe to:
Posts (Atom)